Hi, my name is Joshua Waters and welcome to SharpshooterJD.com. Today I will be showing you how to make some really simple throwing spikes made for spin throwing, out of 1/2 inch mild steel round rod, that are easy to make, and throw and stick better than almost any other knife/spike I have ever used. Throughout the text of this article, I have placed links to the tools and materials needed to make this project, to better equip you to follow along and try this for yourself if you so desire. Now, let’s begin.
The Two Methods Of Construction
There are two simple ways of constructing these throwing spikes. For both of these methods the main thing we have to do is cut the stock to length, and somehow taper the tips to a point. Cutting the stock is pretty simple and there are many different ways to do it. These include using a hacksaw, an angle grinder, a metal cutting band saw, a chop saw, or anything else that has the capability of cutting steel. For our purposes today I will be explaining the process using a hacksaw as it’s the cheapest and simplest to use.
The two different methods of construction come into play while tapering the tip to a point. We have two distinct options. We can forge them, or we can use a grinder/file to shape the points. I will be talking about both methods below.
Forging Throwing Spikes
For this method, you will need the 1/2 inch mild steel rod, a hacksaw, or some other way of cutting the metal, a MAP PRO gas torch, a hammer (this one isn’t great, but it works and it’s cheap), and some kind of anvil (a vise anvil can work, pieces of railroad track also work great, or if you can’t get your hands on either of those, you could probably get away with using a large flat rock, although it will be much more difficult).
I have a video of the forging process below, but I will also be explaining it in the text below the video if you prefer to read rather than watch:
Step 1 – Cutting The stock
The first step for both methods is to cut our stock down to an appropriate length. You can find the 1/2 inch mild steel round rod at your local Home Depot in 3 and 4 foot lengths. I have found that 1 foot long spikes seem to be the ideal size and weight, so we are going to start by cutting down our rod into 1 foot increments with our hacksaw. The easiest way to do this is to hold your metal in a vise anchored to a table top and use plenty of lubricating oil while cutting (there are many different types of cutting oil made for this, but WD40 works alright as well). This is going to take some time and elbow grease, so be patient.
Step 2 – Forging The Point
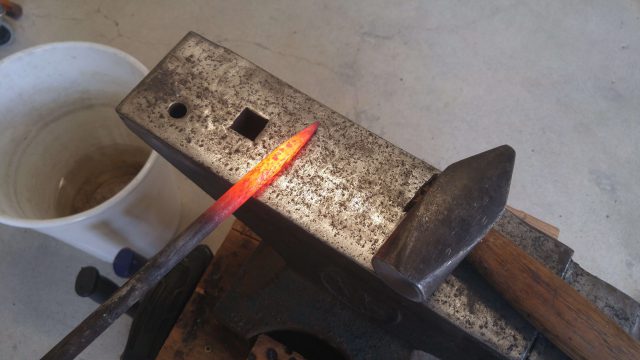
To forge a point, take one of your new 1 foot lengths of rod, and heat up the end of the rod with your torch until it is glowing red. This might take a while as the torch is just barely hot enough to get it to that temp, but it will work (just make sure you get a MAP PRO gas torch or an oxy-acetylene torch, propane is not hot enough for this). Once it is up to red hot, you are going to hold the end of the rod at a shallow angle on the edge of your anvil and hit the end with your hammer a couple times, then turn the rod 90 degrees and repeat. Continue this process until the metal no longer looks red, then heat the metal back up and repeat the process. You should start seeing a taper form as you continue to work it. Keep in mind, the tip does not need to be super sharp, just pointed enough to stick into a piece of wood.
Once your tip is formed, you can decide whether you want the tip rounded, or square. From my testing, I didn’t really notice any difference in performance between the two, so I would personally go with a square tip as it’s simpler. If you want a rounded tip though, simply heat the stock back up, and hammer down the edges of your square, which will make it an octagon, then hammer down the edges of the octagon. Continue doing this until you have your round point. Finally, heat it up one last time and make sure everything is straight. Then, you can quench it in a bucket of water and you are nearly done.

Step 3 – Finishing Touches
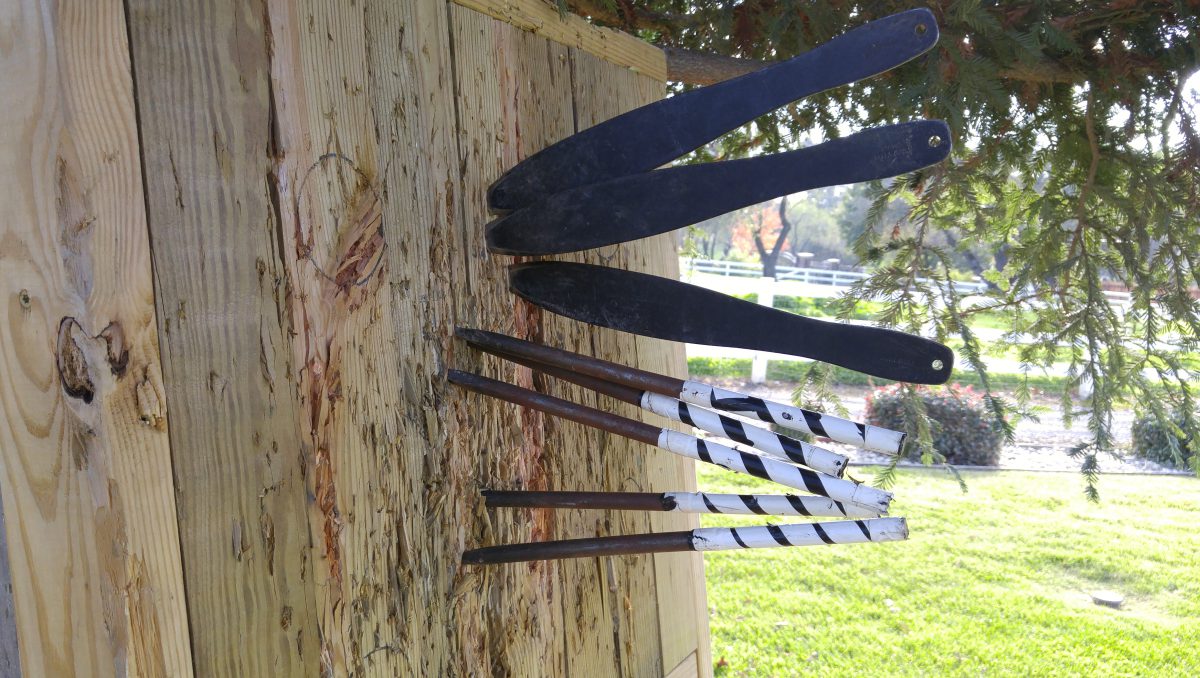
At this point, you should round the opposite end of your new spike with a file or some sandpaper to keep it from cutting you, and to make it feel better in your hand while throwing it. You can also clean up the spiked tip with some sandpaper if you would like. Another optional thing to do is to give your spike some kind of handle. I have used tape in the past, you could also use leather or something similar, but I believe this just hinders the performance of the spike, as it throws best if it can slip out of your hand. So I would recommend just leaving it alone. Lastly, you can paint the end, or the whole handle, with some bright color to make it easier to find when you miss. This is extremely helpful if your spikes blend in with the surface of your throwing area.
And with that, you have a completed throwing spike! Now if you want, you can simply repeat this process until you have a whole set of them!
Grinding/Filing Throwing Spikes
For this method, you will need the 1/2 inch mild steel round rod, a hacksaw, or some other way of cutting the metal, and a file, a bench grinder, or an angle grinder.
Step 1 – Cutting The Stock
Again the first step is to cut our stock down to an appropriate length. You can find the 1/2 inch mild steel rod at your local Home Depot in 3 and 4 foot lengths. I have found that 1 foot long spikes seem to be the ideal size and weight, so we are going to start by cutting down our rod into 1 foot increments with our hacksaw. The easiest way to do this with a hacksaw is to hold your metal in a vise anchored to a table top and use plenty of lubricating oil while cutting (there are many different types of cutting oil made for this, but WD40 works alright as well). This is going to take some time and elbow grease, so be patient.
Step 2, Option 1 – Filing The Point
To file a point, you are going to set up your stock in a vise or clamp it to something securely, and while holding the file at the angle you want your point to taper, file away a flat area of the tip. Next, rotate the stock 90 degrees, and repeat the process until to have a nice square taper.
At this point, you can decide whether you want the tip rounded, or square. From my testing, I didn’t really notice any difference in performance between the two, so I would personally go with a square tip as it’s simpler and might be a bit stronger. If you want a rounded tip though, simply file down the edges of your square, which will make it an octagon, then file down the edges of the octagon. Continue doing this until you have your round point.
Keep in mind, files work best and stay sharpest when you only file on the forward stroke. So try to pick up the file on the backstroke, and make long smooth strokes for best efficiency. I am personally terrible at this and have never really mastered filing. But this is what everyone keeps telling me.
Step 2, Option 2 – Grinding The Point
To grind your point, you are going to take your 1 foot length of rod, and while holding it at an angle (you could do this by hand, or make a jig to maintain the angle) slowly rotate the rod against the spinning grinder wheel. That’s literally it. It takes a ton of patience and time, but it is not complicated. Continue rotating the rod and adjusting the angle until you get the point that you want.
The friction from the grinding will eventually heat the metal up, so be sure to cool the rod down in some cold water periodically, or whenever you start seeing discoloration on the tip, or start feeling the heat in your hands.
Step 3 – Finishing Touches
Again, once you reach this point, you should round the opposite end of your new spike with a file or some sandpaper to keep it from cutting you, and to make it feel better in your hand while throwing it. You can also clean up the spiked tip with some sandpaper if you would like. Another optional thing to do is to give your spike some kind of handle. I have used tape in the past, you could also use leather or something similar, but I believe this just hinders the performance of the spike, as it throws best if it can slip out of your hand. So I would recommend just leaving it alone. Lastly, you can paint the end, or the whole handle, with some bright color to make it easier to find when you miss. This is extremely helpful if your spikes blend in with the surface of your throwing area.
And with that, you have a completed throwing spike! Now if you want, you can simply repeat this process until you have a whole set of them!
Conclusion

And that’s it. Two incredibly simple ways to make some great throwing spikes. If you would like to make these for yourself, there are links built into the text throughout the article to the various tools and materials you will need. Most of these are links to the tools I use and recommend, but some of my tools are old ones, or that I have gotten for free, so in these cases I have simply linked to Home Depot’s page for that tool so you can take a look at what’s available, and get a picture of what one might cost.
One last thing about them before I go. These are made out of mild steel, so they cannot be hardened. This means they will bend over time, and if they hit something hard like concrete, or a rock the tips will bend and flatten. So you do have to be careful with them, and they do require some maintenance, but because of the price of quality throwing knives and spikes, I think this is a great bargain considering you can make 3 of these spikes out of an $8 dollar rod of steel. These aren’t the end all to beat all, but they work really well for what they are, and altogether this is a great, simple project to try for beginners and experienced metalworkers alike.
If you have any questions please leave them down below, I love lending a hand in any way I can, and I am very quick to respond.
Thanks for reading, have a great day, and God bless!
Joshua Waters
.
.
Awesome article! Easy to follow. Very informative. And I love having the option of looking at the video if I want to, but scrolling through the text if I want to get the info faster. Can’t wait to see more! Good job!
Thank you so much! I’m so glad you liked it!
Great job Josh. It’s informative, clear, and you give me options. Looking forward to more.
Thanks man! Very glad you liked it! Make sure to subscribe to get notified of future content!
This is really interesting and really awesome to know, I really like all the tips you provide to making these throwing spikes, I never came across this information before and your methods of construction are really easy to follow and understand. Roughly speaking how much do each of methods cost? thanks
Thank you so much for the kind words! Great question! The answer depends on if you have the tools already. You can make 3 of these throwing spikes out of a $7-$8 piece of 1/2 inch steel rod. But that assumes you already have the tools. If you do not, then you have to add the cost of the equipment. If you go the file route, you would need a hacksaw which is about $20-$25, a file which would be like $10, and some way to hold the piece. You could probably get away with using some clamps, so maybe another $10-$15 for that. That would be the cheapest way. The forging route would cost about $50 for a small anvil or piece of railroad track, $50 for the torch, and about $20 for the hammer. Not including the safety equipment. So really this assumes that you already have some of the equipment already, or that you are getting started in metalwork, and are prepared to buy some equipment to get started. I have link to most of the things you will need, built into the text of the article if you want to check the prices yourself. Hope this answered the question, and thanks for the comment!
Incredible! This blog looks just like my old one! It’s on a totally different topic but it has pretty much the same layout and design. Excellent choice of colors!
Thank you very much! I am really proud of how it turned out. This was the first website I ever built. I put a lot of hard work into it!
It’s exhausting to seek out educated folks on this subject, but you sound like you recognize what you’re speaking about! Thanks
You are very welcome :).
Hey, Josh. Ireally liked the video! I love to make things like this. Throwing knives,spikes and ‘hwaks is a whole lot of fun. I got all the stuff to build a slingshot target like yours, and when it warms up some, I’m gonna set it up.Can’t wait. Thanks for the videos. H ave a great day . Larry Canter